|
License Manager 11.10 is being replaced by 11.12.1.1 due to a possible limited vulnerability to the so-called "Heartbleed" bug. Note that if you do not run your license server on a network that's accessed from the Internet, you may not need to install this update. This article walks you through the steps to upgrade your License Manager server. Read it carefully and completely before proceeding. These instructions should only be used to upgrade from 11.10 while migrating the settings and licence keys. For a completely new installation of v11.12.1.1, follow the License Manager installation instructions given in the Netron Fusion release notes.
The upgrade is done in three stages: - Pre-upgrade preparation;
- Running the License Manager v11.12.1.1 installer in "upgrade/migrate" mode
- Post-upgrade checks
Pre-upgrade PreparationFirst, you must go into the License Manager administrator interface to update the current configuration on the Netron license daemon prior to upgrade. - Start a web browser on your Licenase Administrator server. Go to http://localhost:8080 to display the Licence Manager Administrator Dashboard. If this doesn't bring up the dashboard, you may need to try http://localhost:8090.

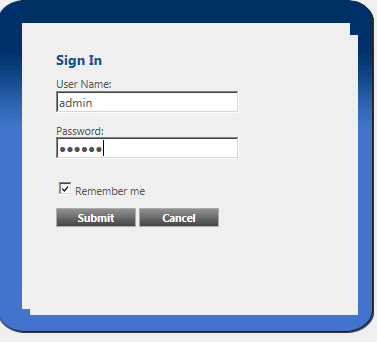
Click on the "Administration" link, circled above. You will be asked to provide a password for the admin ID:
This will take you to the System Information page:
 - Click on the Vendor Daemon Configuration tab, on the lower left. This will display the information for the netronda license daemon for Netron Fusion:

Click on the Administer link. This will take you to the information page for the netronda daemon:

- In the Vendor Daemon Configuration page, you need to enter the name and relative path of the vendor daemon executable into the Vendor Daemon Location field, as shown above. The upgrade installer uses this information to migrate the current daemon and license file to the upgraded server.
If you installed v11.10 according to the instructions provided by Netron, then you just need to enter "netronda.exe" in this field, since the daemon is locatted in the License Administration install directory. After you've done that, click the Save button at lower right. If you mis-typed the vendor daemon location, the browser will display an error in red text and give you an opportunity to re-enter your information. - Once you've successfully saved this information, you can log out of the License Administration dashboard and close the browser.
- IMPORTANT: Back up the installation directory for the current install. Better yet, if you're running the License Manager within a virtual machine, take a snapshot of the machine in a working state.
- Download the installer for License Manager 11.12 from this link: lmadmin-i86_n3-11_12_1_1.exe.
- Open up an Administrator Command Prompt. The usual way this is done is to go to the Start Menu, select "All Programs", and locate the Command Prompt icon under Accessories. Then, right-click the icon and select "run as administrator", then supply the necessary administrator credentials when prompted.
- From the Administrator command prompt, type the following command:
net stop lmadmin
This shuts down the License Manager service. - From the Administrator command prompt, type the following command:
sc delete lmadmin
This deletes the License Manager service from the list of runnable services. You are now ready to run the installer in "upgrade" mode for v11.10.
Running the License Manager v11.12 Installer to upgrade- The License Manager installer you downloaded in a prior step, lmadmin-i86_n3-11_12_1_1.exe, must now be run in Administrative mode. To run with elevated Adminiatrator priveleges, you can do any of the following:
- run the installer from the Administrator Command prompt; or
- find the installer in the Windows Explorer, right-click on it and select "Run as administrator". - The initial installer screen comes up:

Click Next to continue. - IMPORTANT: the next screen, Choose Install Folder, suggests installing into a folder called "C:\Program Files\FlexNet Publisher License Server Manager". DO NOT USE THIS FOLDER NAME. It is too long for the license migration function, and the upgrade will fail and leave you with a non-functional License Server. Instead, we strongly recommend something much shorter, e.g.,
"C:\Program Files\lmadmin11.12.1.1".
 - The next screen, Import files from Previous Installation, needs to be modified as follows:
- The Previous Installation Path needs to be entered. This is the path to the License Server install location for v11.10. Usually this is something like:
"C:\Program Files\FLEXnet Publisher License Server Manager". If you don't remember, you can click on the "Choose..." button to navigate to the 11.10 install folder.
- click the Yes Import checkbox to tell the installer to migrate the license files and Netron vendor daemon from the 11.10 installation to the new server:

Click Next to continue. - The next screen, Pre-Installation Summary, gives you an opportunity to review the Install and Import directories and go back to change them. Click the Install buttion to begin the upgrade.
- After a few moments, the Visual C++ 2008 Redistributable dialog asks you if you want to install this package. Click Next to lauch the VC 2008 installer. It will take several minutes to run. Once it is done, click the Done button and return to the FlexNet installer dialog.
- The next screen, Launch Configuration, asks about the ports used by the HTTP administration interface and the Server process. The Administration interface now uses port 8090; if you want to continue use the old port (8080) you can enter that now. The inbound and outbound server port will be imported from the 11.10 installation, so leave it as is and click Next to continue.
- The next screen, Service Configuration, asks if you want to have the server run automatically as a service, or as a manually-started executable. We strongly recommend running it as a service so that it will start automatically when the License Server machine is booted up:

Click Next to continue. You will briefly see a status bar as the 11.10 settings, license files and daemon are imported to the new server.
- The next screen, Start the Server, asks if you want the License Server started immediately by the installer. Click on the Start server now checkbox so that you can test the upgrade as soon as the installer is finished:

Click Next to continue. At this point the installer will start the service, and launch the new FlexNet Publisher dashboard in a browser window. Once it finishes loading, we can proceed with the post-upgrade checks. Leaving the browser window open, swich back to the installer's Install Complete window and click the Done button to exit. - At this point, theoretically, the new license server should be running, and the dasboard should be loaded into a browser window. However, sometimes the installer is not successful starting the service, so you may need to open an Administrator command prompt and type the command:
net start lmadmin
...to get the license server going, post-install.
Post-upgrade ChecksBy now the dashboard window should be loaded and running in a browser window. Once the dasboard is running in a browser, click on the Concurrent button to see the Netron license daemon, netronda:

Now click on the Administration link to ensure that you can still log in. Once logged in, you should see a System Information tab like this:

NOTE: Your host name, domain and IP address will be different to what you see above. IMPORTANT: At this point, if you are using a firewall, and had previously configured it to allow lmadmin.exe (The Licence Manager Service executable) and netronda.exe (the Netron License Daemon executable) to communicate on the network, you will have to revisit those settings and make sure the rules apply to the executables in their new location (e.g., c:\Program Files\lmadmin11.12.1.1).
Now that License Administration v11.12.1.1 is configured to communicate through your server's firewall, go to a machine with Netron Fusion 3.5.1 installed (preferably one that you know worked before the upgrade) and try to run the SlickEdit application. It should launch with no license dialogs. If for some reason it asks for a license server name, this usually means that the new install is not running as a service, or that it is being blocked by a firewall. |


